
Learn why loosening your lower back & neck will help you treat lower back and swim much faster
Learn to swim freestyle FREE!!The purpose of learning how to swim freestyle in steps is to make it possible for everyone, a teenager or a grownup, an athlete or a beginner – to understand and learn how to swim in an easy way. It also makes it easier to practice the swimming technique alone, without a coach and to learn swimming online.
The senior coaches of WEST swimming, spent a lot of time on analyzing every detail of the stroke in order to better explain and teach it to the swimmer.
Learning to swim in steps is also important for an advanced swimmer since this makes it possible to focus on the rest of the body, apart from the arms. It also lets us protect the joints and the exercise becomes a sort of water therapy.
The gentle rolling movements of the body that come about from the easy stretch, provides the lower back with relief. This means that even a person suffering from a slipped disc has a chance to learn how to swim freestyle, with ease and benefit from it.
If you still experience pain,or you want to learn more:
Learn the basics of freestyle swimming free
In your “Learn swimming online course” you will not only learn to swim freestyle, you will learn to swim faster, easier and treat your lower back.
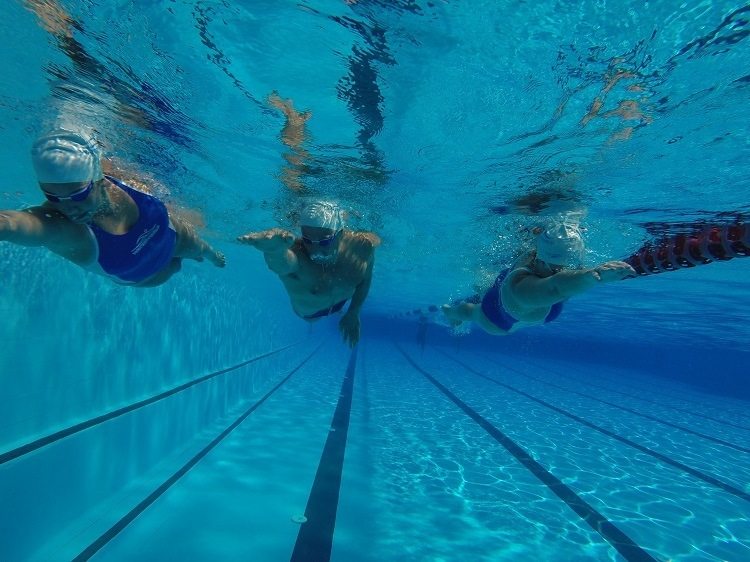
WEST swimming treats thousands of people from lower back pain all over the world with the unique swimming technique.
| Video + exercise objective in WEST swimming technique. |
|
| 1. | Learn to swim freestyle 1-The walking windmill in WEST swimming technique: You walk forward and rotate your arms while you are moving your body. It is very important to keep the fingers and arms relaxed and loose, and to stretch the arms forward but not too far as not to cause the neck any stress. This practice can be done in shallow water, and also when the water reaches up to the shoulders. Throughout this practice we keep our head in a forward and relaxed position. We will keep the same gap between the hands. When one hand goes into the water the other hand will come out of the water, just like a windmill. The purpose of this practice is to warm up the body and the joints, to make the body used to the movement before learning how to swim freestyle, the rotating movement, and the breathing. If we walk in deeper water with the chest below the surface it will be helpful for the mentioned above and also for making the lungs used to the water. This practice expands the lungs, and it prepares them to stop breathing and to move on to the following swimming technique exercises. |
| 2. | Learn to swim freestyle 2-Gliding windmill This swimming exercise, like exercise number 1, is also a windmill type of practice. We direct our heads towards the floor of the pool, and we swim with completely straight arms. When the palms and elbows are in the water we start gliding forward for a period of 1-2 seconds. We will try to glide at a comfortable depth somewhere between 30-40 cm under the waterline, and in accordance with your WEST swimming technique stroke depth. It is very important not to move the head but to bring the shoulders to the center as part of the stroke. When we are out of air we will blow air bubbles out of our nose and bring the arms back ,to stand up. The purpose of this practice is to create a streamline and to get a feeling of how our activity makes the body float. We also want to get the arms used to swimming freestyle movement but in a full movement range. We use this exercise also to improve our floating ability and to expand the lung capacity while we are not breathing. It is very important not to try to get the furthest, but rather to swim slowly and warm the body properly. By gliding slowly we learn how to swim freestyle and loosening the lower back. |
| 3. | Learn to swim freestyle 3-Superman WEST swimming. Lying like Superman, with a body angle of 45 degrees, while looking down at the pool floor, releasing the body, the palm is at the optimal stroke depth, the shoulder touches the chin or cheek. While the body is rolling, the right hand is stretched and the left hand touches the thigh. You kick between 3-5 seconds with the legs, at the same time you keep your head at the same depth. When you are out of air you blow bubbles out of your nose and like in the previous exercise we move back the arms and stand up. If you want to, it is possible to practice this with snorkel and fins. The purpose of this learn to swim freestyle exercise, is to get the body to the right kind of rotation, and to strengthen the core muscles. When we know how to keep the rolling movement correct, it will be much easier for us to swim, and we will be able to shape beautiful and elastic muscles. |
| 4. | Learn to swim freestyle 4-Belly button to the wall and a back flip In this exercise we will work on a big rolling body movement of about 90 degrees. We will kick with the legs till our belly button is positioned towards the wall, and then we continue to kick for another 5 seconds before we get back into the starting position. Throughout all of this, we continue the kicking movement of our legs. We roll the body again, but this time the head will roll together with the body instead of staying in the direction of the floor. We do this till we complete a complete flip of 180 degrees ,with bobbles through the nose , with the belly button and head towards the sky we catch our breath, and then we move the body back to the starting position. We kick for a few seconds, and then we roll the body again, but this time in the opposite direction. In the beginning it is recommended to practice this exercise with the help of fins. The purpose of this learning swimming exercise is to teach the body how to roll without working with the neck. All you need to do is to let the head follow along with the movement without adding to it. Also, when we know how to roll to the back in a span of 180 degrees, half of the way is always much easier, while breathing in freestyle. |
| 5. | Learn to swim freestyle 5-Breathing with the hand on the wall In this exercise we will lay one hand on the wall, at a depth that we feel comfortable with. We will use the legs to push ourselves towards the wall. In the beginning it is also possible to do this from a standing position. You will kick with your legs 3-5 seconds, and you roll your body a full 90 degrees. At this time the head moves together with the body to a correct breathing position. This means that you will have half an eye in the water during each turn. You bring your head back to starting position, and then you will roll the body again towards the wall but this time with a back flip. At the end of rolling 90 degrees and 180 degrees, you will do the same but in the opposite direction, and with the other hand on the wall. The purpose of this exercise is to make a half roll and a full roll with the body. When we can control these 2 movements without moving the neck we will be prepared for proper and good breathing and we will also protect our back and neck. It also makes it easier to swim correctly without letting the body fall or stop the streamline, especially while breathing. |
| 6. | Learn to swim freestyle 6-Breathing in freestyle every 3 strokes with a back flip We will swim crawl , and we take air every 3 strokes. The emphasis here is not on how you fold the arm, but rather to keep a good stroke as described in the previous exercises. By the third stroke we roll over to the back while keeping the neck in a loose position. We will breathe in slowly and then continue swimming for another 3 strokes. It is very important when you flip to keep the front hand in a forward position in order to use it for pushing water with while returning the body and head to the water. The purpose of this swimming workout is to combine swimming freestyle with long breathing cycles. During the first steps of swimming we don’t have enough air, so we need to figure out how to catch our breath slowly and rest while we are swimming. Many swimmers start to sink while they catch their breath due to faster and shorter movements and the absence of any rest during breathing. In west swimming technique you will have more air and at the end you will swim much faster. |
| 7. | Learn to swim freestyle 7- freestyle, breathing every 3rd stroke + 3 seconds breathing pause You swim crawl with straight or folded arms. Every 3 seconds the belly button moves to the direction of the wall. One shoulder is above the other, one hand is in front of your head, and the other lies alongside the body. The head is positioned relaxed on the shoulder, and the lower eye is half in the water and half outside of the water while the mouth is completely outside of the water. While breathing in freestyle we stay for 3 seconds with the belly button in the direction of the wall, and we kick with the legs. If you swallow water you should try to move the eye in the water deeper so that the mouth and the nose will move out of the water. The purpose of this swimming exercise is to reach, as fast as possible, a good and accurate breathing position. Usually, after breathing, the body tends to sink, so we will try to roll the body slower in order to achieve a good freestyle breathing position without the need to move the body more or to adjust the head and the neck. |
| 8. | Learn to swim freestyle 8 -The 3 points in WEST swimming technique- In this swimming exercise we try to think of each point separately. We let each part of the body get the time and respect that it deserves. The first point is to touch the water with the palm. We want to feel and hear that the palm will touch the water before the elbow. The second point is to insert the elbow into the water. We direct the elbow downwards as if we want it to touch the floor of the pool, and after the elbow is in the water we will start to stretch the arm forward. The third point is to let the shoulder touch the cheek or the chin. Obviously we are not interested in the swimming to become robot like, so we will try to keep the shoulders as loose as possible while inserting the hands into the water. The purpose of this swimming exercise is to help us relax during each point, and to see that we are able to release the body, the neck and the back, and that we also manage to control the movement without going up and down. This exercise is excellent for swimmers who are not keeping the symmetric line, by not keeping their elbow in the right angle. It is also good for those who are not flexible in the area of the shoulders |
| 9. | Learn to swim freestyle 9-learn to swim Freestyle with slow gliding + understanding: number of strokes. After we learnt how to release the body, to roll it, and to breathe right – we are ready for the step where we count the strokes. We will swim 25 meters or yards and we will count how many times the hands will touch the water. While we swim we will try to release the hands as much as possible above the water. After the elbow goes into the water we will stretch the arm for about 2 seconds to the right depth according to the WEST swimming technique. At this point we will try to breathe every 3 strokes, and also to count the movements. If we get confused while swimming it is not the end of the world. The most important is to estimate how many strokes we will make during a distance of 25 meters or yards. The purpose of this swimming exercise is to count the amount of movements during one lap, without the legs working. This is the best indication of the productivity of the swimming. With the minimal amount of movement involved in the swimming, the body will get the furthest with minimal effort. You will protect the lower back, and you will progress faster in the future. The goal with this step is to swim slowly with less than 20 strokes per lap. |
| 10. | Learn to swim freestyle 10- The holy triangle of WEST swimming technique. Amount of movements, heart rate, time The last exercise of this set of 10 easy steps to learn how to swim freestyle is the holy triangle of the WEST swimming technique. We swim for 25 meters or yards. While swimming we will count the amount of movements. When we reach the wall we look at the watch, see the time and we check our heart rate for 10 seconds. For example: 19 movements, heart rate 23, time 35 seconds. The main purpose of this swimming exercise is to understand the 3 parameters together, and how each element will influence the other. However, unlike advanced training – here we try to swim as slow as possible, to be able to swim with less than 20 movements for 25 meters or les than 19 in 25 yards, with a heart rate of less than 24, which is 144 bpm (about 75% of our ability), and to see in which time we can do this. During the first steps the time has no meaning, except for seeing how we progress each month when using the swim WEST technique. Enjoy . |
How to swim 1000m freestyle in a price of 1 private lesson?